
Today we'll learn how to use Supabase to add sign-up and sign-in to a browser extension.
We will reuse our existing cross-browser extension template:
https://github.com/akoskm/vite-react-tailwindcss-browser-extension
This post will put the Cat Facts application behind a login screen while teaching you Supabase authentication basics.
Please note that the manifest file only enables this plugin on https://blank.org. This means that the plugin won't be active on any other site.
But first things first, let's set up a new Supabase project.
Supabase has an excellent getting-started guide for React that you can follow here.
We'll be doing the same things but in a bit different order.
Set up a new Supabase project
After logging into Supabase, head to All Projects and click New Project.
Create a new project with the Free - $0/month plan.
Enter the project details and wait for it to be initialized.
After the initialization is done, on the project screen, find the section Connecting to your new project and copy the JavaScript snippet it provides:
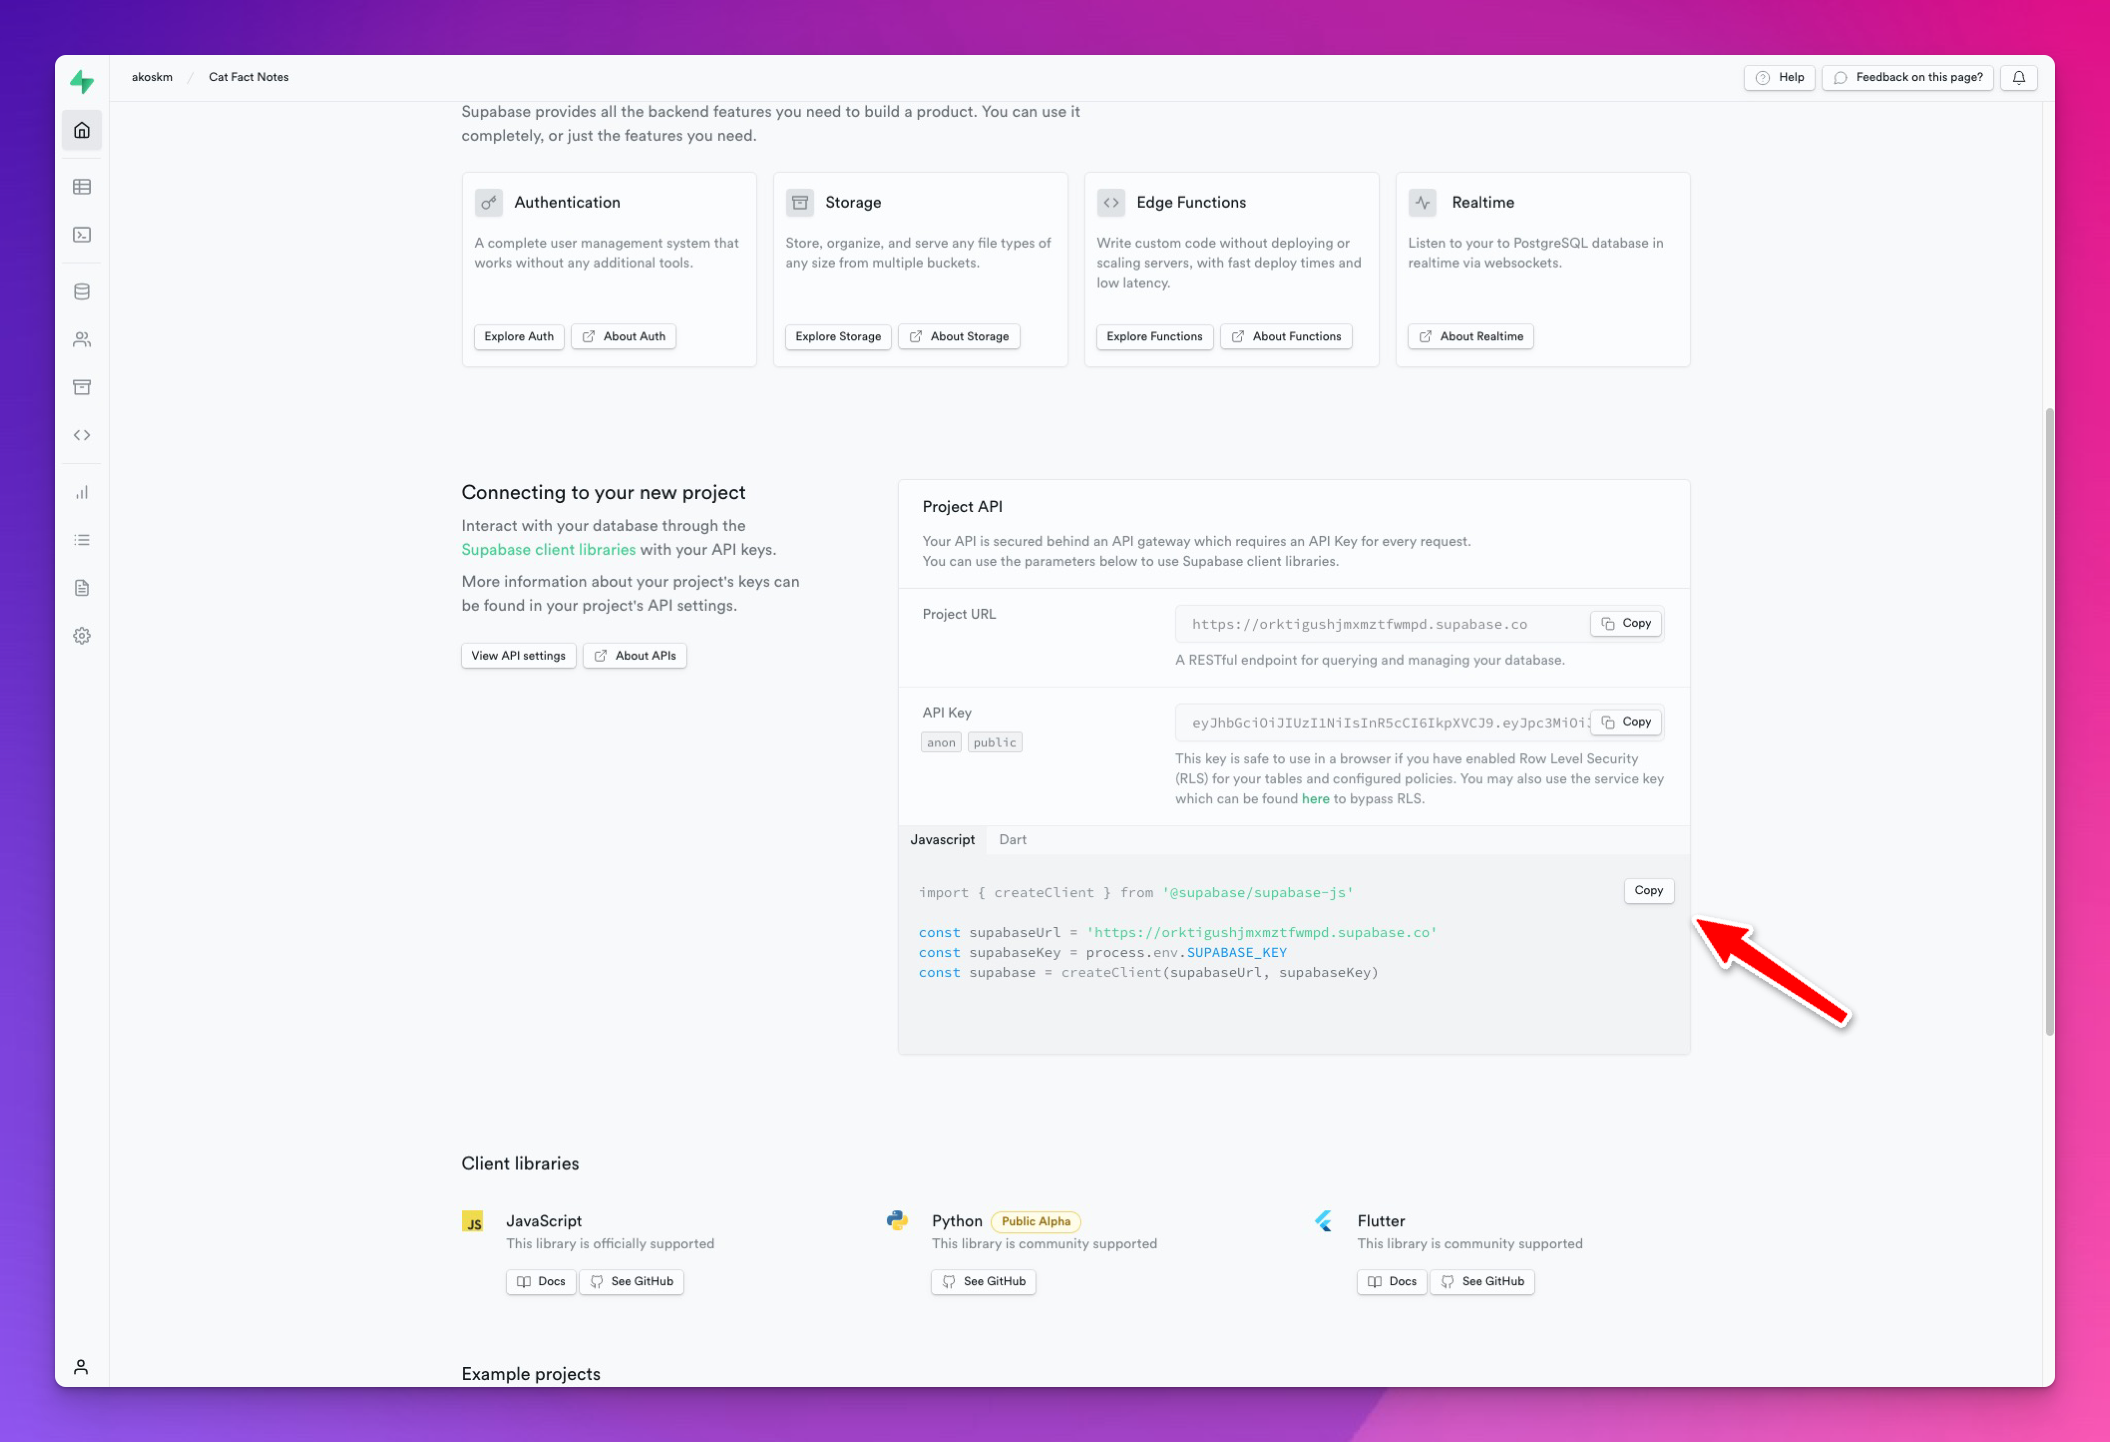
Set up the Supabase client
Now open the vite-react-tailwindcss-browser-extension repo that you just cloned or have it from the previous tutorial and create a new file: src/supabase_client.ts where you paste what you just copied.
While in a desktop or a server-side app, you would store the SUPABASE_KEY in an environment file, in the case of browser plugins, because we ship the entire thing to the client anyway, I just put it in the supabase_client.ts.
Let's also export the supabase client at the end of this new file:
import { createClient } from '@supabase/supabase-js'

const supabaseUrl = 'https://orktigushjmxmztfwmpd.supabase.co'
const supabaseKey = 'eyJhbGciOiJIUzI1NiIsInR5cCI6IkpXVCJ9.eyJpc3MiOiJzdXBhYmFzZSIsInJlZiI6Im9ya3RpZ3VzaGpteG16dGZ3bXBkIiwicm9sZSI6ImFub24iLCJpYXQiOjE2NzAwNTA2NTksImV4cCI6MTk4NTYyNjY1OXO.4XZvJi1jWbj5GWqRHB7Jgri7jnGMFGk-vkFKgeNDU0s'

const supabase = createClient(supabaseUrl, supabaseKey)

export default supabase;
This key is safe to use in a browser if you have enabled Row Level Security (RLS) for your tables and configured policies. I was so confused and spent some time researching how to hide this key before figuring out that I didn't have to!
We won't be writing to the database in this tutorial so the RLS configuration won't be needed, but you can read more about it here.
Finally, let's install the only dependency we'll need from Supabase.
$ npm install @supabase/supabase-js
We will use the Supabase JavaScript client to let users create accounts and log into our app.
Other packages
To keep our components clean, we'll install formik and use it to manage our forms:
$ npm install formik
To have nice default inputs in a TailwindCSS-driven webpage, we'll also install @tailwindcss/forms:
npm i -D @tailwindcss/forms
You'll find the setup for these in the GitHub repo.
Use Supabase client in the background script
As we already know from previous tutorials, the background script is the place to make API requests.
This is why we're implementing sign-up, sign-in, sign-out, and session fetching here.
Let's import the ./src/supabase_client.ts script to our background script and handle the sign-up and sign-in messages:
// ./background.ts
import browser from "webextension-polyfill";
import supabase from './src/supabase_client';

type Message = {
  action: 'fetch' | 'getSession' | 'signout',
  value: null
} | {
  action: 'signup' | 'signin',
  value: {
    email: string,
    password: string,
  }
}

async function handleMessage({ action, value }: Message, response: ResponseCallback) {
  //  ...
  } else if (action === 'signup') {
    const result = await supabase.auth.signUp(value)
    response({message: 'Successfully signed up!', data: result});

  } else if (action === 'signin') {
    console.log('requesting auth');
    const {data, error} = await supabase.auth.signInWithPassword(value);
    response({data, error});

  }  else if (action === 'getSession') {
    supabase.auth.getSession().then(response)

  } else if (action === 'signout') {
    const {error} = await supabase.auth.signOut()
    response({data: null, error});
  }
  // ...
}
We're using the auth module of the supabase client that already comes with a super straightforward interface for handling the user sign-up flow, sign-in, sign-out, and session retrieval. Here are the functions we use above with links to their official docs:
Before we dive into the user sign-up and sign-in, let's talk about how we'll handle showing different screens to the user.
Routing in a browser plugin
In the case of a web app, when the user wants to sign in, you redirect them to the /signin page.
We cannot do that here because our plugin lives in the context of the web page that the user is currently looking at.
I created a diagram to show you all the possible states of our UI:
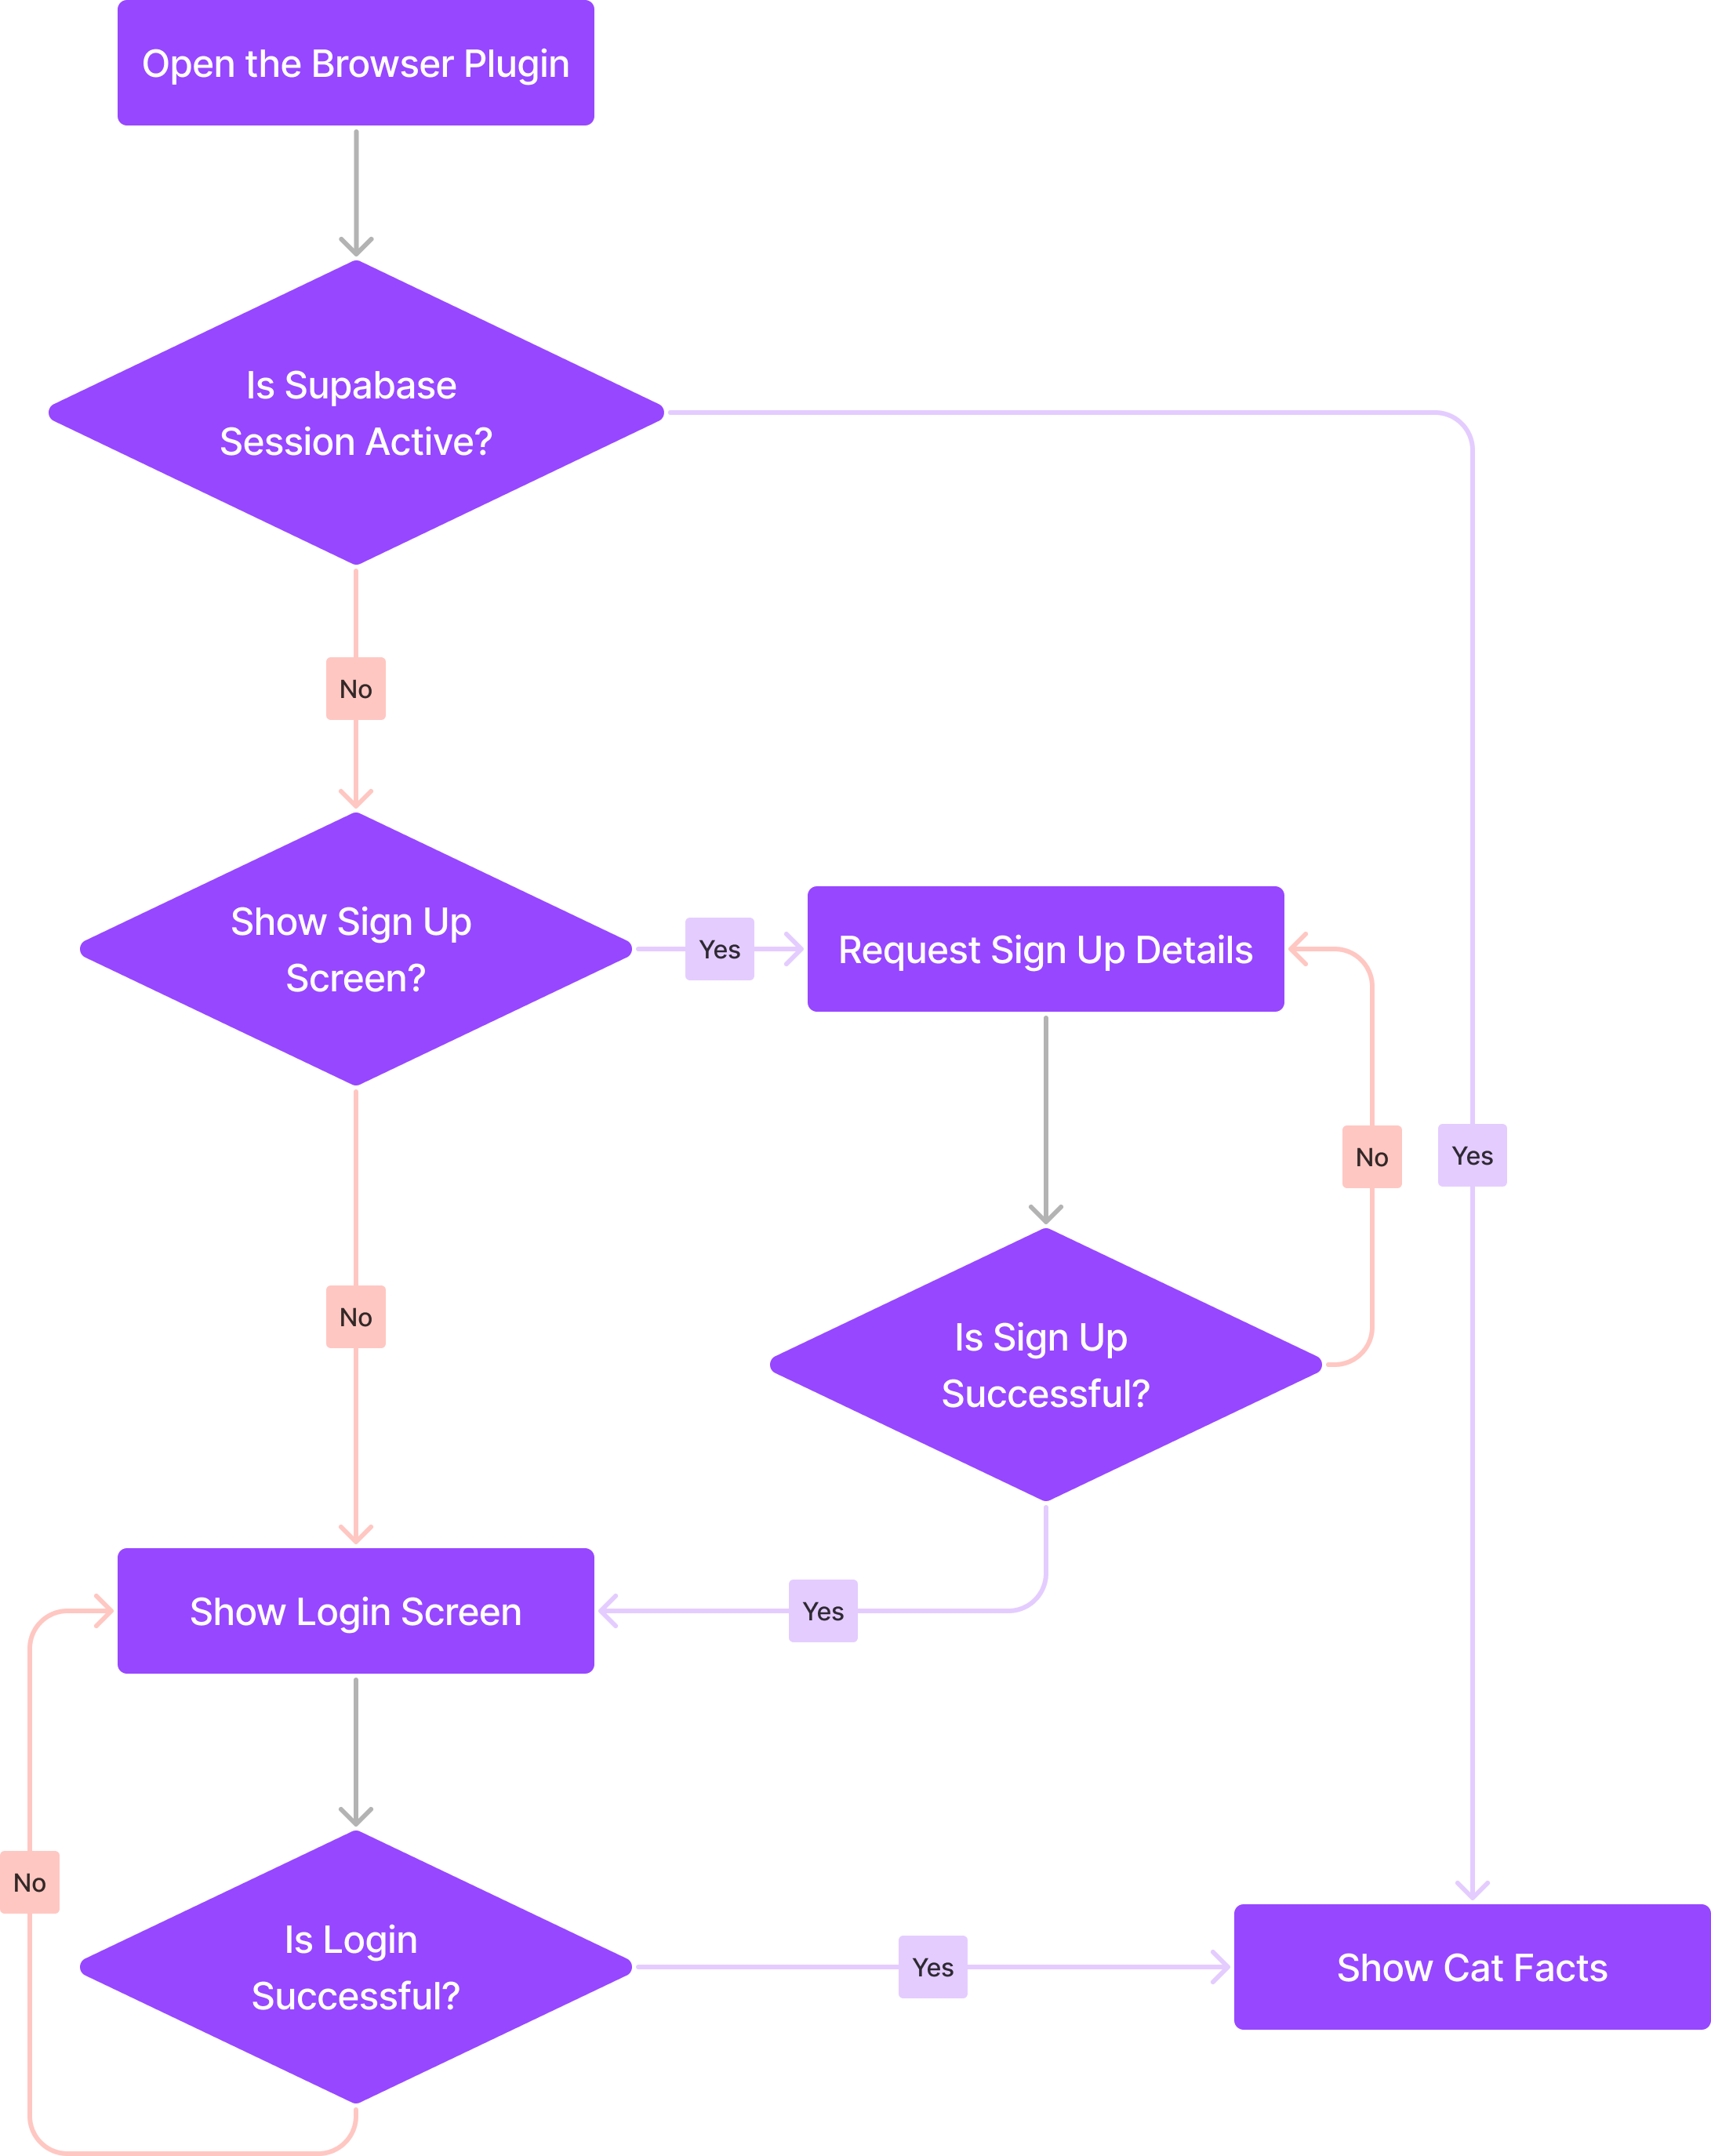
To facilitate showing different screens based on different states we will create a state called screen that will indicate at which step the user is currently.
Actions like sign-up will modify the screen state and change it to SCREEN.SIGN_IN for example, and renderApp will return the appropriate component:
enum SCREEN {
  SIGN_IN, SIGN_UP, FACTS
}

const App = () => {
  // ...
  const [screen, setScreen] = useState(SCREEN.FACTS);
  // ...
  function renderApp() {
    if (!session) {
      if (screen === SCREEN.SIGN_UP) {
        return <SignIn title='Sign Up' .../>;
      }
      return <SignIn title='Sign In' ... />
    }

    return (
      // Cat Fact screen
    )
  }

  return (
    <div className='absolute top-20 left-20'>
      <div className='flex flex-col gap-4 p-4 shadow-sm bg-gradient-to-r from-purple-100 to-blue-200 w-96 rounded-md'>
        <h1>Cat Facts!</h1>
        {renderApp()}
      </div>
    </div>
  )
The next step will be creating the Sign In/Sign up React component.
User authentication
You'll find this component code in the GitHub repo. I'll omit it here for brevity.
It's a simple React Form that captures user input and does something on onSubmit.
The interesting part happens in App.tsx.
Check if the user is logged in
This is going to be the first time we make a request to Supabase when the App mounts:
// App.tsx

  async function getSession() {
    const {data: {session}} = await browser.runtime.sendMessage({action: 'getSession'});
    setSession(session);
  }

  useEffect(() => {
    getSession();
  }, []);
The above function is going to send the { action: 'getSession' } message to the background script that, in exchange, is going to call the getSession function of the supabase.auth module.
When the response arrives, we send it to the caller, our content script.
Because we'll get back either the session or null - if the session cannot be detected - we'll just set whatever we get back from the background script.
Sign up
Let's handle sign-ups by adding this function in App.tsx
  async function handleSignUp(email: string, password: string) {
    await browser.runtime.sendMessage({action: 'signup', value: {email, password}});
    setScreen(SCREEN.SIGN_IN)
  }
Just as in the getSession function, we're communicating our intent to the background script with the {action: 'signup', value: {email, password}} message.
Unlike the session retrieval, this time, the message also contains a value key that contains an object that has the email and password values we entered into the Sign-Up form.
When the Sign-Up form is submitted, we will send these values to the background script where the appropriate branch will run:
// ...
  } else if (action === 'signup') {
    const result = await supabase.auth.signUp(value)
    response({message: 'Successfully signed up!', data: result});
// ...
Finally, if the Sign-Up process is successful, we'll show the user the Sign-In screen.
Let's add the Sign-Up step to our renderApp function and show it when we don't have an active session and the active screen is the Sign-Up screen:
  function renderApp() {
    if (!session) {
      if (screen === SCREEN.SIGN_UP) {
        return <SignIn onSignIn={handleSignUp} title={'Sign Up'} onScreenChange={() => {
          setScreen(SCREEN.SIGN_IN);
          setError('');
        }} helpText={'Got an account? Sign in'} error={error}/>;
      }

      return <SignIn title='Sign In' ... />
    }

    return (
      // Cat Fact screen
    )
  }
A cool feature of Supabase is that it automatically sends signed-up users a confirmation email.
You can't log in without confirming your account, reducing spam and fake sign-ups.
Sign in
The Sign-in flow is almost identical to this, with the only difference being in how we handle the response from our background script:
async function handleSignIn(email: string, password: string) {
  const {data, error} = await browser.runtime.sendMessage({action: 'signin', value: {email, password}});
  if (error) return setError(error.message)

  setSession(data.session)
}
Supabase signInWithPassword can return both an error and a data object.
If there's an error, we capture it here and display it to the user.
Demo
Now let's showcase the entire flow together.
Create an account, log in and fetch some fresh cat facts:
GitHub repo
You'll find the entire project here:
https://github.com/akoskm/vite-react-tailwindcss-browser-extension-supabase
As I mentioned in the intro, it builds on my previous repo:
https://github.com/akoskm/vite-react-tailwindcss-browser-extension
If you want to check out only what's changed between the two codebases, check out commit:
Conclusion
Congratulations on creating your first Supabase Authentication flow!
And not any Supabase Authentication flow, but as a cross-browser authentication flow!
You could use this to make a browser plugin that stores per-user data or hide something considered sensitive behind a login.
After you're logged in to Supabase, your options are endless!
You could initialize a new database, as shown here, and start doing some CRUD:
on user data using the same JavaScript library you used to create and authenticate a user.
I hope you liked this tutorial!
If you're interested in seeing a tutorial where we do CRUD from a browser plugin, let me know in the comments or ping me on Twitter @akoskm.